In the beginning God created the wheel fore he saw that man was useless without it, with all the walking around and carrying things on his back. So He created the wheel and gave it as a gift to man.
It then took man about 40 billion years to figure out what to do with it. God in his infinite wisdom, could wait no longer and imposed upon Leonardo’s mind the vision of the bicycle. Unfortunately, God failed to recognize that the process of anodization and CNC machines had not yet been invented so the vision was left to flounder.
And then woman’s liberation came around and they were sick of being accused of using horses for their own means so they rode these new things called bicycles. Then man did everything he could to take away this freedom and thus the majority spent their time trying to destroy the two-wheeled love machines. Luckily, God intervened and let us keep the best invention of all time, with but one requirement, it be maintained as to keep the bicycle in its paradisaical state.
As God’s messenger, I am here to teach you the good news of bicycle maintenance. It is a high task but one that I cannot shirk lest I be cast down into the fiery pits of cardom.
Today’s lesson, How to exorcise the demons in Lake Bottom Bracket.
Mom, what’s a bee bee?
A BB, or bottom bracket is the piece that allows your cranks (the things pedals are attached to) to spin. This is done in conjunction with some bearings that are effectively attached, pressed or screwed into a bottom bracket shell (the part of the frame where the BB hides). This part of the bicycle experiences a high amount of load and as such should be given your attention. Unfortunately, it is hidden which gives you the ability to ignore the orange stuff growing around your balls.
Currently there are three major types of bb’s being used, at least by reputable manufacturers. There have and are many other types, but if you are reading this I assume you have a “real” bike.
Type 1 is the cup and cone bottom bracket. On this type of bb, the driveside cup is fixed meaning you screw it into the frame and tighten it down. The bearings, usually in a carrier but sometimes loose, are set inside this cup hopefully with grease appplied. The other cup, with bearings sitting inside, goes on the other side of the bike and uses a lock ring to fix the cup when proper adjustment on the bearings is achieved.

The above blurry picture shows a non-driveside cup with the lock ring in place. These two cups are secured around a spindle and the cranks attached to the spindle. This type of bb has lost favor due to its love of coming loose and always needing to be serviced.
Its descendent is based on similar ideas but eliminates the need for adjustment. The cartridge bb was born. This type has a fixed cup on the driveside that includes the sealed cartridge bearings and the spindle. All of this is nicely enclosed in as one piece. The non-driveside cup, sometimes plastic, is fixed to the other side. There is no adjustment in this type of bottom bracket.

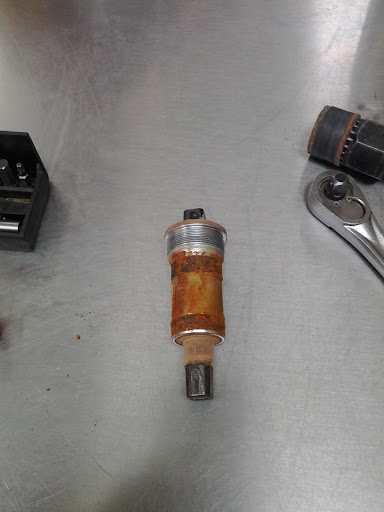
At this point, we’s gots to talk about spindles. As I mentioned above, the spindle is the piece to which the cranks are attached. In the above photo, it is a square taper spindle. As the name insinuates, the spindle is square and is tapered meaning it gets bigger as you go toward the bearings. The crank has a matching square hole that is pressed onto the spindle with the crank fixing bolt.
As mtbers started to destroy cranks with this type of bb, the manufacturers decided it best to create a new attachment system. This is where the splined cranks come into play. (yes, I realize this idea was not new, but it wasn’t until then that it was widely adopted) These eliminated and created issues. The crank was less likely to strip or round out. However, the first few generations tended to have the problem of coming loose and falling off. The spindle was also larger in size forcing the bearings to be much smaller. Smaller bearings wear out faster, that’s just life.

You can see the splines on the spindle and the bigger size. This particular one had a spindle failure.
After a few generations of this, the outboard bb was born of a virgin. This allowed for a larger size spindle and bigger bearings due to the fact that the balls were taken outside of the frame and attached outboard. This created a stiffer system that was also lighter (bet you’ve never heard that before). This also renewed the need for the art of bottom bracket chasing. Any misalignment of the bearings puts extra load on them and causes them to prematurely wear.

And then they went and screwed everything up by going bigger, and Satan tempted man to create the BB30 (ok I guess I can’t count, there are four types we are going to talk about, sue me!). This type took the spindle and enlarged it once again in the name of stiffness, all the way up to 30mm. This created the need of making the bottom bracket shell much larger and then put the bearings back into the gaping hole in the frame. The bearings are pressed into the frame in one way or another.

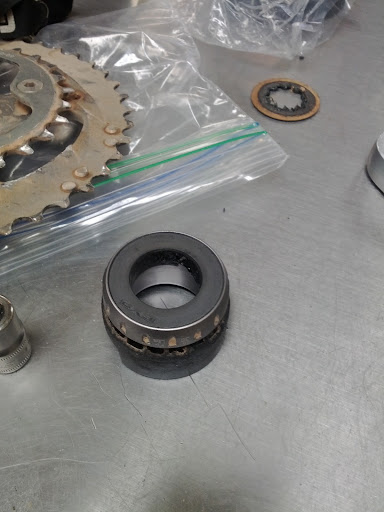
As you can see from all the above pictures, there is an orange mold that tends to grow around your balls when they are left unattended in the bottom bracket shell. This mold grows faster if you use water to wash your bike. So it is best to avoid water and to take your balls out and play with them on occasion.
Exorcising the demons of Lake Bottom Bracket
The first thing to do is to take your bike to your LBS (no this doesn’t stand for lovers of bike shit it stands for Local Bike Shop) and have them chase and face your bottom bracket shell. This only applies to the first three types of bb’s, the gaping hole cannot be faced. Once this is done and done right you should be set for the life of the frame.
Next you will need a few tools to remove the cranks and the bottom bracket bearings. Each bb is different so consult your local lover of bike shit to ensure you get the right ones.
Once you are set with your awesome tools, remove the cranks and then take the bottom bracket out of the shell. It is easy to remember which way to turn the bb cups for removal and installation. For removal spin the cup toward the front of the bike and for installation spin them toward the back of the bike. Yup, on both sides. The lefty loosy, right tighty doesn’t work as the drive side is reverse threaded.
Once you have your balls in your hand, take a rag and clean the bb shell and then the bottom bracket itself. Check the bearings for wear or roughness. Then apply a nice coating of grease to the threads and put the bb back in. On outboard style bearings, be sure to use a torque wrench so you don’t overtighten the bearings and crush them. You will also want to grease the spindle as you slide it back through the bearings.
For that last type of bb, plan on servicing the stupid thing about every six months. If you have the pressfit type, you are going to need a good hammer and a punch and know full well that you will be replacing the cups/bearings about yearly.
If you grease the bb and keep things clean, Lake Bottom Bracket will not form and the orange mold will not grow. You will not get creaks and your bearings will run smoother and last longer making it easier for you to ride.
Now go forth and preach the gospel of bicycle maintenance to all those who will hear it.
